Crystal's World

Welcome to my world! This is where you can see my crafty projects and probably learn a little about me and my projects!

Monday, February 27, 2006

Hats #1


So what 'Knifty Knitter' doesn't have Hats, Hats and more Hats?? So, this is the first posting of hats... I'm sure there will be more!

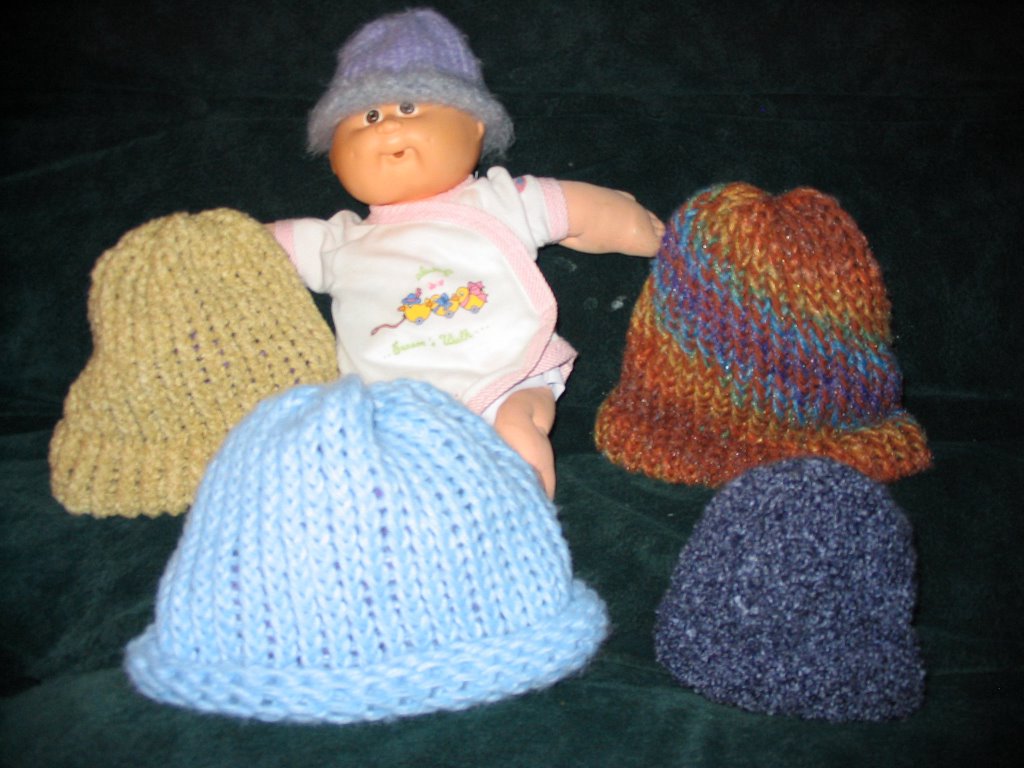
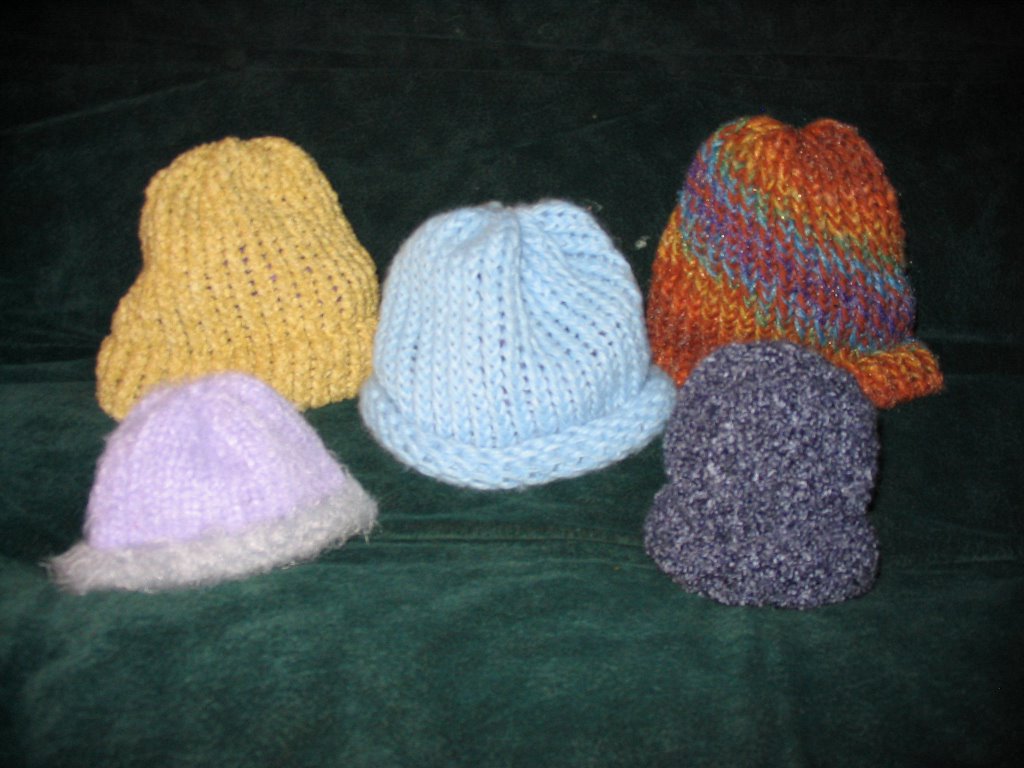
All hats (except the lavendar one) have been done with two strands.
1. The Beige hat was made on the yellow loom with TLC yarn... oooh sooo soft! E-wrap stitch, brim and gathered top.
2. The Light Blue one was done with a fuzzy baby type yarn (it was a hand-me-down from my mom) I have no idea what brand. Yellow loom, E-wrap stitch, no brim, gathered top.
3. The Brown Stripey one was done with 1 strand brown and one strand varigated yarn, (again, hand-me-down yarn, but I think it's Red Heart Super Saver). I love the stripes it created... This one is for Sandi (I didn't forget you!). Yellow loom, E-wrap stitch, brim, and gathered top.
4. The lavendar one is done with the flat stitch (aka True Stockinette Stitch) It was done with some really soft (but really thin) fuzzy acrylic yarn, from Target's One Spot. (OK, it was on clearance for 25 cents each) The hat took 4 skeins. I just couldn't knit this yarn on needles - it was too slippery and soft and it got lost when combined with other yarns. So, I tried something fun - First I used the Embellish-Knit to make all the yarn into I-cord. So fun and fast on that thing!! Then, I used the I-cord to make the hat. It was made on the Green loom - but because the I-cord has stretch and I used the flat stitch... it came out tiny. It's very thick and sooo soft. But, it only fits the dollies and not the daughter it was intended for! Green Loom, Flat stitch, brim, gathered top.
5. The Black/Grey hat was intended to be be a slipper for my son. Done on the blue KK loom, I started the toe with the same method as the flat bottom bag. I used JoAnn's Rainbow Boucle yarn. It made a nice toe (now top of hat) but the slipper was too big for him, so I decided to just make it into a hat. It's very soft and will keep a little head warm! Blue Loom, E-wrap, no brim, rounded top.

There you have my hats so far! Well except for the dark blue one I did for my son and the other brown varigated one done on the green loom. But, I wasn't going into my son's room to get the blue hat (it's dangerous in a tween's room), and you don't want to see duplicates!

Have a Knifty Day!

A Stocking in February???

I know you're thinking I'm nuts... I'm not really! I just wanted to try this pattern... I was given this red yarn --- it was pretty old... Woolworth's Brand! It is a worsted weight yarn like Red Heart Super Saver and I used two strands! It was crying to be made into a Christmas stocking! Who was I to argue? I used the pattern in the first Knifty Knitter booklet for this. Of course, I can't stick with a pattern completely--- I used a flat edge bottom for the toe of the stocking, instead of the gather method. You can't really see it here, but it looks more toe-like.
I'm probably going to donate this one to a charity at Christmas time - although my kids think they each should have it!
My mom made all of our x-mas stockings out of granny squares. I'm not willing to give mine up--- I've had it since my first x-mas! And as each person enters the family, they get one too. It's tradition!

My Knifty Knitter Bags

The Plastic Bag Bag!


The Plastic Bag Bag was made on the Yellow Knifty Knitter Loom with e-wrap throughout. I used 4 teal grocery sized bags (from my local quilt shop purchases) and 2 Large Black Garbage bags that had seen better days-- I had to cut around a few holes. (Of course, they never held garbage... just hand-me-down clothes). The handle was made on the loom using just 2 pegs in a figure 8 pattern - I used Simply Soft Quick for that. The bottom is sewn by drawing the 'bag yarn' through the loops on opposite sides of the loom... like some flat-top hats are done. I cut the grocery bags like they do on this link... Cutting bags
The finished bag measures 13" across and 7" high. The plastic bags that I used were not very 'crinkly', they are pretty sturdy - you know how a black trash bag feels!
OK... so what you really want to know... the cutting took about 1/2 hour (not bad). The knitting took me about 4 hours... I worked on this all day on a Saturday. You really have to keep a very loose wrap- otherwise it is too tight. I e-wrapped the 'yarn' around my thumb and the peg to keep the stitches consistant and loose- and it was still a bit tough to get them over the pegs! (If I made this with yarn, it probably would have taken me 1 hour, start to finish) Would I make another one?... Not anytime soon! Although I've gotten lots of ooohs and ahhs about this bag... it was a lot of work and my wrist hurt for 3 days after this. (Not fun for the carpul tunnel!) I'd be willing to sell it to a goth chick with a thing for plastic!!!


The Flat Bottom Handbag!

This bag was made with Simply Soft Quick Yarn on the Yellow Knifty Knitter Loom. This was done in the same way as the Flat Bottom Bag. I wrapped 14 pegs to start and pulled them over to 13 pegs on the opposite side. This left 7 pegs on either side. This gave a very square shape, believe it or not! I made the handle by wrapping 3 pegs back and forth repeatedly... then attached it to the other side of the bag by putting the loops on the loom and knitted them off.
Next, I continued with the strap and added a round ring to the end (I plan to clip my little cell phone bag to it). It's shown on the outside of the bag here, but it actually settles nicely into the bag.
This one was definitely a learning experience. Here's what I will do differently in the future...
1. Use a more sturdy (maybe even stiff) yarn. This is a very floppy bag!
2. Wrap more pegs in the beginning. Probably about 17 or 18 to give a more rectangular bottom.
3. Tack the flower in more places... when it's not posing for a photo... it's pretty floppy too!
4. Make it in a different color so YOU can see it better!

Monday, February 13, 2006

Flat Bottom Bag - Knifty Knitter

UPDATED PATTERN COMPLETED!!! I've made another bag and checked the numbers... there were a few things I needed to change. Thanks Trudy for bringing it to my attention! ~CrystalI've created this pattern for a little bag - it's made with the blue Knifty Knitter loom.
This one is made with Lamb's Pride Bulky which is 100% wool- one strand throughout. (Using different yarn does effect the number of stitches needed which might require some pattern tweeking!) I plan to felt it- I'll post pics when it's done.

1. Wrap 10 pegs with the e-wrap method. Knit back and forth on the 10 pegs for 8 rows (*please note that when I do a flat panel on the loom, I don't double wrap the end peg twice- in other words, I skip the first stitch on each row -this means that you will only wrap 9 pegs on each row but use 10 pegs total. This does make a difference- less stitches on the sides which enables you to wrap a lesser amount of side loops without leaving any gaps on the bottom.)

2. Now stretch the stitches across the loom and attach them to the opposite side of the loom. I was easily able to put 8 stitches on the opposite side ... this leaves 3 open pegs on either side.
UPDATE: Bethalice has a great tip here about how to keep track of your stitches to stretch them across the loom! She modified this pattern to make a water bottle holder! Check it out!
3. Pick up stitches from the side panels of the knitted piece and put them on the pegs. Like this...
4. Now e-wrap completely around the loom and knit off. Continue knitting around the loom until the bag is as long as you would like it to be. As you knit along you will see the base of the bag develop into a more boxy shape.

5. When the bag is as long as you would like it to be, wrap the first 11 pegs and knit off. Then, bind off 12 stitches. I used the crochet method. (Remove the first loop with a crochet hook, do 1 crochet chain stitch through this loop. Then, lift the next stitch and pull it through the loop that's on the hook. Do another crochet chain and pick up another stitch, pull loop through the loop. Continue until 12 stitches are removed.)

6. The last crocheted loop is then put on the last peg on a round - this starts the purse flap. (If you start with the peg to the left of the side hook of your loom, this means you will put this loop on the peg to the right of the side hook). It should look like the right picture below.
(NOTE: The flap starts 1 stitch before the pegs that you started with at the beginning--- and ends 1 stitch after -- you had 10 stitches at the very beginning and now you are using 12 pegs)

7. E-wrap the remaining 12 pegs and knit off. Knit 4 rows on the same 12 pegs.

8. Decrease by moving the last stich of the 4th row onto the peg next to it and wrap the 5th row. Knit off. Decrease the next row the same way. Knit 2 rows without decreasing. Decrease the next two rows as before. Knit 2 rows without decreasing. Continue in this manner until you are down to just 5 stitches.

9. Bind off with crochet method as above. With the last single stitch on the crochet hook crochet a chain (I made mine 8 single stitches) Cut the yarn about 5" long and put it through the last chain stitch to end the chain. Then, attach chain to other side of bound off top as in the picture (below right). This creates the loop for the button. Weave in the ends.
Now it's done! YAY! Felt if you would like. Before felting and as shown in picture, the bag is about 3 1/2" wide, with a 2" base, and mine is 4 1/2" high. This bag is a good size for my palm pilot. After felting, hopefully it will be the right size for my cell phone!

**I'm a little protective about my patterns so please don't claim it as your own. You are welcome to use it to make some for yourself and your friends... but please don't claim my words or pictures as your own!**