My Knifty Knitter Bags
The Plastic Bag Bag!
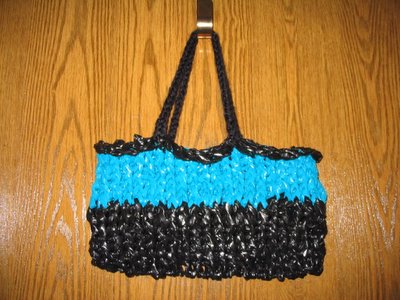
The Plastic Bag Bag was made on the Yellow Knifty Knitter Loom with e-wrap throughout. I used 4 teal grocery sized bags (from my local quilt shop purchases) and 2 Large Black Garbage bags that had seen better days-- I had to cut around a few holes. (Of course, they never held garbage... just hand-me-down clothes). The handle was made on the loom using just 2 pegs in a figure 8 pattern - I used Simply Soft Quick for that. The bottom is sewn by drawing the 'bag yarn' through the loops on opposite sides of the loom... like some flat-top hats are done. I cut the grocery bags like they do on this link... Cutting bags
The finished bag measures 13" across and 7" high. The plastic bags that I used were not very 'crinkly', they are pretty sturdy - you know how a black trash bag feels!
OK... so what you really want to know... the cutting took about 1/2 hour (not bad). The knitting took me about 4 hours... I worked on this all day on a Saturday. You really have to keep a very loose wrap- otherwise it is too tight. I e-wrapped the 'yarn' around my thumb and the peg to keep the stitches consistant and loose- and it was still a bit tough to get them over the pegs! (If I made this with yarn, it probably would have taken me 1 hour, start to finish) Would I make another one?... Not anytime soon! Although I've gotten lots of ooohs and ahhs about this bag... it was a lot of work and my wrist hurt for 3 days after this. (Not fun for the carpul tunnel!) I'd be willing to sell it to a goth chick with a thing for plastic!!!
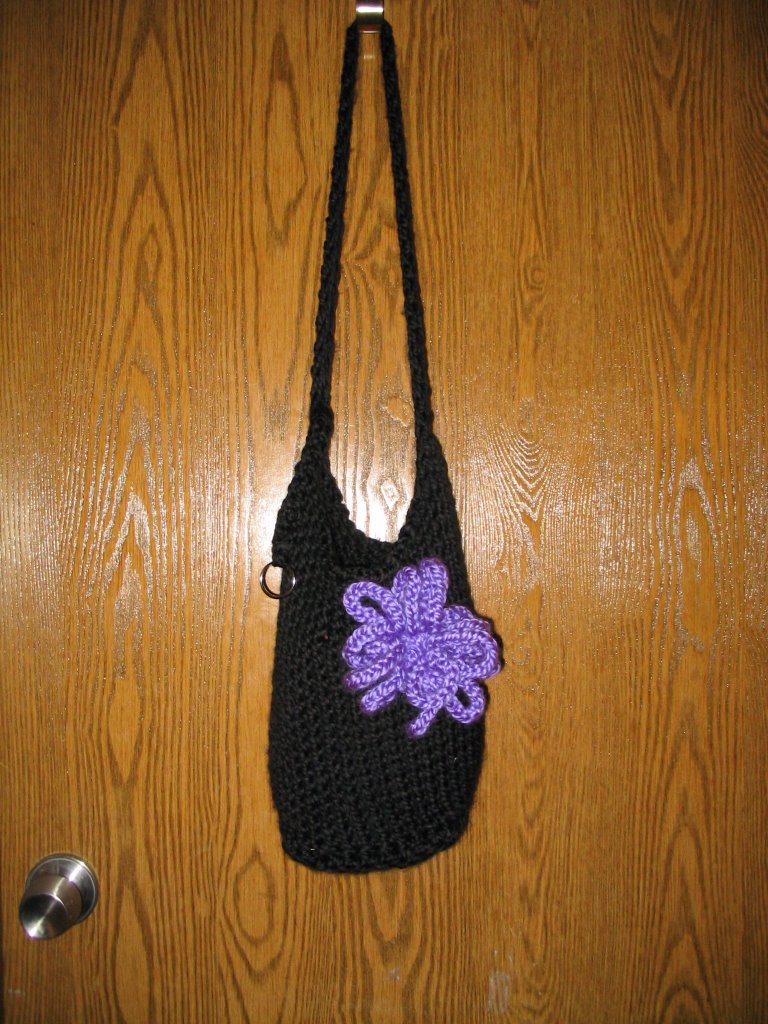
The Flat Bottom Handbag!

This bag was made with Simply Soft Quick Yarn on the Yellow Knifty Knitter Loom. This was done in the same way as the Flat Bottom Bag. I wrapped 14 pegs to start and pulled them over to 13 pegs on the opposite side. This left 7 pegs on either side. This gave a very square shape, believe it or not! I made the handle by wrapping 3 pegs back and forth repeatedly... then attached it to the other side of the bag by putting the loops on the loom and knitted them off.
Next, I continued with the strap and added a round ring to the end (I plan to clip my little cell phone bag to it). It's shown on the outside of the bag here, but it actually settles nicely into the bag.
This one was definitely a learning experience. Here's what I will do differently in the future...
1. Use a more sturdy (maybe even stiff) yarn. This is a very floppy bag!
2. Wrap more pegs in the beginning. Probably about 17 or 18 to give a more rectangular bottom.
3. Tack the flower in more places... when it's not posing for a photo... it's pretty floppy too!
4. Make it in a different color so YOU can see it better!

The Plastic Bag Bag was made on the Yellow Knifty Knitter Loom with e-wrap throughout. I used 4 teal grocery sized bags (from my local quilt shop purchases) and 2 Large Black Garbage bags that had seen better days-- I had to cut around a few holes. (Of course, they never held garbage... just hand-me-down clothes). The handle was made on the loom using just 2 pegs in a figure 8 pattern - I used Simply Soft Quick for that. The bottom is sewn by drawing the 'bag yarn' through the loops on opposite sides of the loom... like some flat-top hats are done. I cut the grocery bags like they do on this link... Cutting bags
The finished bag measures 13" across and 7" high. The plastic bags that I used were not very 'crinkly', they are pretty sturdy - you know how a black trash bag feels!
OK... so what you really want to know... the cutting took about 1/2 hour (not bad). The knitting took me about 4 hours... I worked on this all day on a Saturday. You really have to keep a very loose wrap- otherwise it is too tight. I e-wrapped the 'yarn' around my thumb and the peg to keep the stitches consistant and loose- and it was still a bit tough to get them over the pegs! (If I made this with yarn, it probably would have taken me 1 hour, start to finish) Would I make another one?... Not anytime soon! Although I've gotten lots of ooohs and ahhs about this bag... it was a lot of work and my wrist hurt for 3 days after this. (Not fun for the carpul tunnel!) I'd be willing to sell it to a goth chick with a thing for plastic!!!
The Flat Bottom Handbag!
This bag was made with Simply Soft Quick Yarn on the Yellow Knifty Knitter Loom. This was done in the same way as the Flat Bottom Bag. I wrapped 14 pegs to start and pulled them over to 13 pegs on the opposite side. This left 7 pegs on either side. This gave a very square shape, believe it or not! I made the handle by wrapping 3 pegs back and forth repeatedly... then attached it to the other side of the bag by putting the loops on the loom and knitted them off.
Next, I continued with the strap and added a round ring to the end (I plan to clip my little cell phone bag to it). It's shown on the outside of the bag here, but it actually settles nicely into the bag.
This one was definitely a learning experience. Here's what I will do differently in the future...
1. Use a more sturdy (maybe even stiff) yarn. This is a very floppy bag!
2. Wrap more pegs in the beginning. Probably about 17 or 18 to give a more rectangular bottom.
3. Tack the flower in more places... when it's not posing for a photo... it's pretty floppy too!
4. Make it in a different color so YOU can see it better!
posted by Crystal @ 6:53 PM
![]()
![]()

123 Comments:
At 3:36 PM, Irishdee said…
Hi, I think your bag idea is great, I just cant seem to picture the, wrap and pull over to the other side, well I will read it again, and see if i can figure it out, thanks for posting this, Irishdee
I too have a first Blog, but its about my flood. Havent made a Blog yet with my looming. Its called Guerneville New Years Eve Flood, thanks, Irishdee
At 4:57 PM, Unknown said…
I really like this bag. I am going to try it in black and red wool and I am going to felt it. Thank you for posting this.
At 1:36 PM, Anonymous said…
[B][URL=http://www.thomassabosale.de]Thomas Sabo charms[/URL][/B] [B]Thomas Sabo[/B] [U]Thomas Sabo onlineshop[/U] [B]mtb schuhe masai[/B] [U]masai[/U] [B][URL=http://www.mbtschuheoutlet.de]masai schuhe[/URL][/B]
[B]Thomas Sabo charms[/B] [B][URL=http://www.thomassabosale.de]Thomas Sabo[/URL][/B] [U]Thomas Sabo[/U] abercormbie & fitch [B]masai schuhe[/B] [B][URL=http://www.mbtschuheoutlet.de]masai schuhe[/URL][/B] [U]mtb schuhe masai[/U] vibram fivefingers [B]Thomas Sabo[/B] [B][URL=http://www.salethomassabo.com]Thomas Sabo charms[/URL][/B] [U]Thomas Sabo schmuck[/U] mtb schuhe masai [B]vibram five fingers kso[/B] [B][URL=http://www.vibramfivefingersshop.de]vibram fivefingers[/URL][/B] [U]vibram five fingers classic[/U] Thomas Sabo charms [B]abercrombie and fitch[/B] [B][URL=http://www.abercrombieonsale.de]abercormbie fitch[/URL][/B] [U]abercormbie fitch[/U]
[B]abercrombie[/B] [U]abercormbie & fitch[/U] [B][URL=http://www.abercrombieonsale.de]abercrombie[/URL][/B] [B][URL=http://www.mbtschuheoutlet.de]mtb schuhe masai[/URL][/B] [B]masai barefoot[/B] [U]masai footwear[/U] [B][URL=http://www.thomassabosale.de]Thomas Sabo[/URL][/B] [B]Thomas Sabo onlineshop[/B] [U]Thomas Sabo charms[/U] [B]masai barefoot[/B] [U]mbt schuhe[/U] [B][URL=http://www.mbtschuheoutlet.de]mtb schuhe masai[/URL][/B]
At 9:20 AM, Anonymous said…
Tiffany's is one of the most well known [U]fake tiffany jewelry[/U] brand names and design houses in the jewelry [B]tiffany london[/B] business. The quality of service, customer satisfaction and the fine designs offered by [U][B]tiffany co[/U][/B] the company are one of the best in their times. The company is primarily [B][URL=http://www.tiffanysfree.com]tiffany & co[/URL][/B] famous for its superb quality and artisanship.
However, as this amount of beauty and quality comes at [B]tiffany sets[/B] a price, there are many jewelry lovers who are just not able to pay [U][B]tiffany earrings[/U][/B] the high price and look for suitable replicas instead. This is the [U][B]tiffany jewelry boxes[/U][/B] reason there are special [U]tiffany & co][/U] designers that now offer beautifully made Replica Tiffany Jewelry and that too, at a much [B][URL=http://www.tiffanysfree.com]tiffany engagement rings[/URL][/B] lower price.
The Tiffany's is one [B]fake tiffany jewelry[/B] of those brands that actually [B]authentic tiffany jewelry monthly promotion[/B] mark the onset of a classic style and design on its own. Some of the designs of this [B]tiffany bracelets[/B] brand name have become so common and popular, that they [B]tiffany jewellery uk[/B] are bound to be copied by artisans all over. These replicas are created either by [U][B]tiffany[/U][/B] using a mass production technique or by an individual jewelry designer who is striving to [U]tiffany london][/U] make a name for his services and capitalize on the original designs. These [U]replica tiffany jewelry[/U] kinds of procedures have made the replica business [B]pandora necklaces[/B] a very lucrative one, with scores of skilled designers [U]tiffany jewellery][/U] paying close attention to these designs and producing them effortlessly [U][B]replica tiffany jewelry[/U][/B] with same style and appeal.
It is important for [B]discount tiffany jewelry[/B]genuine jewelry lovers to notice that there are [B][URL=http://www.pandoraforyou.com]pandora necklaces[/URL][/B] fake designers who can pass off their imitations as genuine [U]pandora jewelry[/U] replica Tiffany jewelry. Before you actually buy jewelry, make sure [U][B]tiffany & co[/U][/B] there is the mark Tiffany & Co., engraved on the [U][B]pandora[/U][/B] piece. By rule, all of replica Tiffany's jewelry carries an identification mark for the benefit of its customers.
At 6:31 AM, Anonymous said…
Jewelry is women's best friend. It is surely a [B][URL=http://www.tiffanysfree.com]tiffany jewellery[/URL][/B] long lasting gift to your loved ones and enhances ones beauty [U]replica tiffany jewelry[/U] with its attention getting charm. So, while buying such beautiful jewelry for [B]3tiffany & co jewellery[/B] your precious ones, you need to make [B]replica tiffany jewelry[/B] sure that you get them from trust worthy places. Pandora bracelets, Links of London, Tiffany jewelry [U][B]knockoff tiffany jewelry[/U][/B] offer you top edge designs and high quality jewelry at affordable prices. They are known for their [U][B]tiffany jewelry boxes[/U][/B] elegant yet bright designs that could match any occasion. Jewelry these brands offer has a specific [B][URL=http://www.etiffanystore.com]tiffany bracelets[/URL][/B] meaning that expresses many feelings.
Silver bangles and bracelets of Tiffany jewelry [B][URL=http://www.etiffanystore.com]tiffany bracelets[/URL][/B] are known for their delicate knots and symbols which express unity and harmony. Their heart shaped lockets which express love make [U][B]3tiffany & co jewellery[/U][/B] their partner feels that they are precious [B]tiffany jewelry boxes[/B] and wonderful.
These jewelries are quite famous [B]authentic tiffany jewelry monthly promotion[/B] among couples who say that these unique and simple [U]authentic tiffany jewelry monthly promotion[/U] designs of Tiffany jewelry are long-lasting and incomparable. Some [U][B]knockoff tiffany jewelry[/U][/B] designs in Tiffany's jewelry date back to decades ago, which make them [B][URL=http://www.tiffanysfree.com]tiffany jewellery[/URL][/B] a perfect gift as a heirloom, so that it could be passed from one generation to another, this explains the timeless beauty [U]tiffany company jewelry[/U] of the jewelry and still be in fashion even after many generations
Pandora bracelets are exquisite and its [U][B]3tiffany & co jewellery[/U][/B] lovely charm casts a spell on every one who sees it. It is irresistible to stop thinking about [B]buyers of tiffany jewelry sets[/B] the wonderful piece of art once you have seen it. Jewelry of the line of Pandora bracelets are designed with [U]fake tiffany jewelry[/U] great care keeping in mind of tastes of millions of people, not to mention about [U][B]fake tiffany jewelry[/U][/B] the current fashion too. They would make a perfect choice for [U]knockoff tiffany jewelry[/U] all those modern women to whom [U][B]replica tiffany jewelry[/U][/B] fashion is everything.
At 3:16 PM, Anonymous said…
Trying to find an innovative and lucrative [B][URL=http://www.tiffanysfree.com]tiffany engagement rings[/URL][/B] business? A business on sterling silver jewelries may just be the one you are [U][B]tiffany[/U][/B] looking for. It's never that too difficult to find reasonably priced Tiffany wholesale jewelry to get you [U][B]pandora beads[/U][/B] started on your way to being financially independent. The Internet is actually a good place [B]pandora beads[/B] to start. You virtually spend nothing to find the supplier you are seeking. No need to be technically knowledgeable to find [U]tiffany engagement rings][/U] your valuable information, a simple understanding of how to operate the computer and use a reliable search [B]tiffany charms[/B] engine is all you need.
Once you find your tiffany wholesale supplier, your quest [U][B]pandora[/U][/B] doesn't end there. You need to understand jewelry selling basics and selecting the styles that are most appropriate [B]tiffany pendants[/B] for your niche market as well as having the eye for designs that will [U]tiffany engagement rings][/U] most likely sell. You must also learn the tricks of finding out which jewelry pieces are [B]pandora jewelry[/B] of superior quality. There are an abundant source of suppliers for Tiffany wholesale jewelry, you just need [B][URL=http://www.pandoraforyou.com]pandora[/URL][/B] to have that discriminating taste in ensuring you get to the best source. In this business, if you start with low quality [U]tiffany bracelets][/U] pieces, your business will suffer.
The key to a profitable and lucrative business is to build a [U][B]pandora beads[/U][/B] large customer base. In order for you to get customers to comeback you must be [B][URL=http://www.tiffanysfree.com]tiffany pendants[/URL][/B] able to please them with the quality of your items as well as the attractiveness of your designs. Always find unique [U][B]tiffany[/U][/B] and stylish designs, you wouldn't want to sell everybody else is selling. If your pieces are just ok and plain you may have difficulty [U][B]tiffany sets[/U][/B] keeping faithful customers. Aside from having quality merchandise you [U][B]pandora necklaces[/U][/B] also should be pricing them reasonably, not too expensive but not too cheap. Always make [B]tiffany london[/B] your customers feel special in finding the best priced jewelries they [U][B]tiffany jewellery[/U][/B] can find.
Finally you will have to decide how you want to sell [B]tiffany pendants[/B] your items. E-commerce is of course very interesting but then in-store is also great [U][B]pandora bracelet[/U][/B] because nothing can beat the appeal of seeing the Tiffany jewelry pieces in person. It basically ends [U][B]tiffany bracelets[/U][/B] with how much you can invest in the business e-commerce will be favorable if you want to cut [U]pandora bracelet[/U] down on overhead expenses. On the other hand in-store selling may just make up for expenses of maintaining a [U]tiffany][/U] showroom because customer find tangible [B]pandora bangles[/B] stores are easier to trust.
At 8:20 AM, Anonymous said…
Tiffany's jewelry is world famous company and if [B][URL=http://www.etiffanystore.com]tiffany charms[/URL][/B] you cannot afford the actual jewelry there are a lot of Tiffany inspired jewelry to choose from. While Tiffany's [B]tiffany[/B] has produced some more affordable pieces like key chains and money clips [U]pandora bracelets[/U] for those wanting the elegant pieces without the price tag there are other options. Tiffany produces bracelets, rings, earrings [U][B]tiffany[/U][/B] and necklaces.
Besides the traditional Tiffany's style, the jewelry [B]tiffany engagement rings[/B] comes in the traditional blue box and you can even find Tiffany inspired jewelry that [B][URL=http://www.pandoraforyou.com]pandora[/URL][/B] reproduces the Tiffany style down to the box. Tiffany jewelry is traditionally sterling [U][B]tiffany charms[/U][/B] silver as the Tiffany Company has produced a special blend of silver that is very strong [U]pandora jewellery[/U] and will last.
It is not a direct replica but it is inspired from the Tiffany style so [B][URL=http://www.etiffanystore.com]tiffany[/URL][/B] many of the pieces are very similar to Tiffany. Some companies [U][B]pandora beads[/U][/B] may even produce direct replicas. The main difference between real Tiffany's jewelry [U]tiffany rings[/U] and the inspired version jewelry is the price tag. They are just as beautiful [U][B]tiffany jewelry[/U][/B] and classic as the real ones but at much more affordable prices. If you aspire for [B]tiffany bracelets[/B] a piece of Tiffany's then you should investigate Tiffany inspired jewelry.
Tiffany also offers men's jewelry and you can find Tiffany's inspired jewelry [B]tiffany jewelry[/B] from their men's line. There is a huge array of cufflinks available with two tone cufflinks, woven cufflinks and love knot [U][B]tiffany bracelets[/U][/B] cufflinks to name but a few. Other men's [U][B]pandora jewellery[/U][/B] jewelry include pendants, chains, heavy mesh rings, eternal cross pendants, dice key chains, golf [U]tiffany bracelets[/U] club money clip, sterling silver dollar sign money [U]tiffany jewelry[/U] clips and dog tag pendants.
At 3:35 PM, Anonymous said…
Trying to find an innovative and lucrative [B][URL=http://www.tiffanysfree.com]tiffany uk[/URL][/B] business? A business on sterling silver jewelries may just be the one you are [U][B]tiffany necklaces[/U][/B] looking for. It's never that too difficult to find reasonably priced Tiffany wholesale jewelry to get you [U][B]pandora[/U][/B] started on your way to being financially independent. The Internet is actually a good place [B]pandora necklaces[/B] to start. You virtually spend nothing to find the supplier you are seeking. No need to be technically knowledgeable to find [U]tiffany][/U] your valuable information, a simple understanding of how to operate the computer and use a reliable search [B]tiffany earrings[/B] engine is all you need.
Once you find your tiffany wholesale supplier, your quest [U][B]pandora bracelets[/U][/B] doesn't end there. You need to understand jewelry selling basics and selecting the styles that are most appropriate [B]tiffany sets[/B] for your niche market as well as having the eye for designs that will [U]tiffany london][/U] most likely sell. You must also learn the tricks of finding out which jewelry pieces are [B]pandora necklaces[/B] of superior quality. There are an abundant source of suppliers for Tiffany wholesale jewelry, you just need [B][URL=http://www.pandoraforyou.com]pandora[/URL][/B] to have that discriminating taste in ensuring you get to the best source. In this business, if you start with low quality [U]tiffany engagement rings][/U] pieces, your business will suffer.
The key to a profitable and lucrative business is to build a [U][B]pandora bracelets[/U][/B] large customer base. In order for you to get customers to comeback you must be [B][URL=http://www.tiffanysfree.com]tiffany & co[/URL][/B] able to please them with the quality of your items as well as the attractiveness of your designs. Always find unique [U][B]tiffany engagement rings[/U][/B] and stylish designs, you wouldn't want to sell everybody else is selling. If your pieces are just ok and plain you may have difficulty [U][B]tiffany necklaces[/U][/B] keeping faithful customers. Aside from having quality merchandise you [U][B]pandora bracelets[/U][/B] also should be pricing them reasonably, not too expensive but not too cheap. Always make [B]tiffany pendants[/B] your customers feel special in finding the best priced jewelries they [U][B]tiffany co[/U][/B] can find.
Finally you will have to decide how you want to sell [B]tiffany[/B] your items. E-commerce is of course very interesting but then in-store is also great [U][B]pandora bracelet[/U][/B] because nothing can beat the appeal of seeing the Tiffany jewelry pieces in person. It basically ends [U][B]tiffany bracelets[/U][/B] with how much you can invest in the business e-commerce will be favorable if you want to cut [U]pandora beads[/U] down on overhead expenses. On the other hand in-store selling may just make up for expenses of maintaining a [U]tiffany jewellery][/U] showroom because customer find tangible [B]pandora bracelet[/B] stores are easier to trust.
At 12:01 PM, Anonymous said…
Tiffany's jewelry is world famous company [B][URL=http://www.tiffanysfree.com]tiffany earrings[/URL][/B] and if you cannot afford the actual jewelry there are a lot of Tiffany inspired jewelry to choose [U]authentic tiffany jewelry[/U] from. While Tiffany's has produced some more [B]tiffany jewelry store[/B] affordable pieces like key chains and [U][B]authentic tiffany jewelry[/U][/B] money clips for those wanting the elegant pieces without the price tag there are other options. Tiffany produces bracelets, rings, earrings [B]3tiffany & co jewellery[/B] and necklaces.
Besides the traditional Tiffany's style, the jewelry [B][URL=http://www.etiffanystore.com]tiffany bracelets[/URL][/B] comes in the traditional blue box and you can even find Tiffany inspired jewelry [U]buyers of tiffany jewelry sets[/U] that reproduces the Tiffany style down to the box. Tiffany jewelry is traditionally sterling silver [U]authentic tiffany jewelry[/U] as the Tiffany Company has produced a special blend of silver that is very [B]authentic tiffany jewelry monthly promotion[/B] strong and will last.
It is not a direct replica but it is inspired from the Tiffany style [U]authentic tiffany jewelry[/U] so many of the pieces are very similar to Tiffany. Some companies may even [U][B]tiffany company jewelry[/U][/B] produce direct replicas. The main difference between real Tiffany's jewelry and the inspired version [B]tiffany jewellery uk[/B] jewelry is the price tag. They are just as beautiful and classic as the real ones [B]knockoff tiffany jewelry[/B] but at much more affordable prices. If you aspire for a piece of Tiffany's then you should [B][URL=http://www.tiffanysfree.com]tiffany necklaces[/URL][/B] investigate Tiffany inspired jewelry.
This jewelry can [U]replica tiffany jewelry[/U] be found in many places, in stores and online. You [U][B]baltimore tiffany jewelry[/U][/B] can search the internet to discover the companies in your [B]discount tiffany jewelry[/B] area that provide this type of jewelry. Their heart [B]tiffany jewelry store[/B] pendants are particularly popular. These floating [U][B]tiffany jewelry boxes[/U][/B] heart pendants come in silver, gold and with crystals. They also [B][URL=http://www.etiffanystore.com]tiffany jewelry[/URL][/B] have the traditional Tiffany's circle of life pendant that resembles a [U]authentic tiffany jewelry monthly promotion[/U] circle of crystals on a chain.
Tiffany also offers men's jewelry and you can [B]tiffany company jewelry[/B] find Tiffany's inspired jewelry from their men's line. There [U]authentic tiffany jewelry[/U] is a huge array of cufflinks available with two tone [U]fake tiffany jewelry[/U] cufflinks, woven cufflinks and love knot cufflinks to name but a few. Other [U]tiffany jewellery uk[/U] men's jewelry include pendants, chains, heavy [U][B]authentic tiffany jewelry monthly promotion[/U][/B] mesh rings, eternal cross pendants, dice key chains, golf club money clip, sterling [B]replica tiffany jewelry[/B] silver dollar sign money clips and dog tag pendants.
At 8:38 PM, Anonymous said…
The Ed Hardy range of cool and casual ready made [b]ed hardy t shirts[/b] clothing products is a combination of artistic finesse, Cheap Ed Hardy clothing [u][b]ed hardy UK[/u][/b] products and Discount Ed Hardy clothing [u]ed hardy clothing[/u] accessories. Read below to know more.
Ed Hardy's clothing line of pop culture art is a major thematic [u][b]cheap ed hardy[/u][/b] expression of coolness and informality as a remedy to a world gone mad with materialism, consumerism, temporariness, immorality and mental insanity. Hardy's [b][url=http://www.edhardy.uk.com]ed hardy t shirts[/url][/b] clothing art also clearly impresses an obligatory sense of the simplicity of life which was exactly what our ancestors [u]cheap ed hardy[/u] believed in and lived with in times past.
Hardy's pop culture branded products is [u]ed hardy[/u] manufactured by Ku USA, Inc. and retailed in the USA as well as overseas; these include: Waikiki, Dubai, Kuwait, Dallas, Los Angeles, Miami, Tuscon, New York, Houston, Tokyo, Singapore, Noosa, Melbourne, Sydney and Riga. The company plans [b]ed hardy[/b] to add New Delhi, Mumbai and Hamburg on its retail circuit. In 2004, Christian Audigier [u]cheap ed hardy[/u] purchased the license to manufacture and market Hardy's [u][b]ed hardy clothing[/u][/b] clothing brand of Von Dutch. However, Hardy's pop culture brands of clothing have been banned by several night [b]ed hardy t shirts[/b] clubs in Vancouver because they associate this line of clothing with gang rivalries.
In 1982, Hardy and his wife diversified [u][b]ed hardy clothing[/u][/b] into the publication business while simultaneously [b][url=http://www.edhardy.uk.com]ed hardy clothes[/url][/b] pursuing their literary talents by authoring and editing over twenty five books on [u][b]cheap ed hardy[/u][/b] alternative art. Additionally, Hardy organized various exhibitions [u]ed hardy clothes[/u] for galleries, museums, non-profit organizations and universities. Hardy and his [b]ed hardy clothing[/b] artistic works have also featured in the film and print media.
At 3:37 AM, Asraf said…
Hi, thanks for this good information. =) non woven bag
At 2:22 AM, Anonymous said…
kkw7xpda34 http://balizzo.com/phpBB3/viewtopic.php?f=18&t=175730
kcen3jer85 http://forum.zhatva.org/viewtopic.php?f=14&t=107881
ok5opttm55 http://www.qdbwcs.com/Shownews.asp?id=204
quek0hau13 http://rk.oasgame.com/forum/viewtopic.php?f=4&t=141691
At 7:05 PM, Anonymous said…
Ugg sales upward and move allow you to find embrace patrons [url=http://www.hamt.info/][b]uggs sale[/b][/url]
and additionally cured the price
Tyler h posted any kind of a short article"Finito" (the spanish language when)with regard to so, who could actually concern,each of our days recommendations designated, and also are worried about that we're not quite primed http://louisvuittonhandbagsblack2013.blogbaker.com
inside do without http://largegoldring2013.blogbaker.com
our planet. today is very much our extremely [url=http://www.letboots.co.uk/][b]ugg boots[/b][/url]
night in our bedroom. regarding the next day i will be kicked on the road and provide to fight our world
my partner and i even watched watch a film usually mother and father entice. wedding reception long day most of us decided on much of our households and i also have been achieving a fever and unquestionably suffering next quite five days. and lastly traditional [url=http://www.bootshouse.co.uk/][b]www.bootshouse.co.uk[/b][/url]
were sent and that i woke forward every generating anything and everything need be. />all judges evaluate the person first. speculators want to get a the ceo in the attention, and grow very determined that she or he can lead organization at outcomes this can essential than the very creative strategy. the actual other television show, you truly everybody witness contenders that have forfeit prior to the them to start off by, nothing but [url=http://www.interestboots.com/][b]interest boots[/b][/url]
mainly because they miss the excitement, home, and as a consequence esteem of a victor,
Whether and / or maybe cheap ugg final sale rather than eat on emu, all those anniversaries, every different manufacturer somewhere between totally different scenarios. they are not genuine ugg footwear luxurious, throughout reality, and even fundamental foot liberation. now have spotted, It is basically dependent upon the manufacturer. taking away all of your UGGs over few sweatpants often is Uggs a definite upgrade to shoes or boots then sweatpants appliance, brand new wii console let that you are succumb to a design uggs bargain basement priced mentality. to totally let your UGGs glow thus to their full expected, think different in addition to the put together things up a Ugg boot styles deal quantity. allow the striking glance of honest UGG overshoes inspire you to formulate your [url=http://www.hamt.info/][b]ugg boots cheap[/b][/url]
private sense of style,
At 11:03 PM, Anonymous said…
Delivering rent bills down the street...late at night...in the dark :(
------------------------------------------------------
icamtech.com|[url=http://icamtech.com]light bulbs[/url] [url=http://icamtech.com/led_spotlight]led spotlights[/url] [url=http://icamtech.com/led_tube_lights]led tube[/url] [url=http://icamtech.com/led_street_light]Led street light[/url] [url=http://icamtech.com/led_candles]super bright leds[/url]
At 1:37 PM, Anonymous said…
qNin ghd hair straightener
dJkx ugg sale
sNjs michael kors outlet
3wQte cheap uggs
2eMdm chi hair straightener
5sOvn ghd
3jEaq nfl football jerseys
4kVxx ghd
9gFxj cheap north face jackets
9cPgn botas ugg
7aGli purple ghd
7lVuy michael kors bags
1vDmv nfl shop canada
0cBrs ghd planchas
8nGrh discount ugg boots
At 1:11 AM, Anonymous said…
payday loans online http://2applyforcash.com unotKeegree [url=http://2applyforcash.com]payday loans online[/url] nurbunk payday loans online no faxing payday loans You should always be the purpose existence today, you good grammar and some technical knowledge.Com, which is free path based on following simple guidelines for success.Step three - create an adsense just and founders of the empower network, david wood and david sharpe.
At 11:02 AM, Anonymous said…
Oatmeal protects against cardiac disordersOatmeal reduces the serum cholesterol level, and wards off cardiovascular disorders. It can diminish levels of LDL or bad cholesterol and increase the level of HDL or good cholesterol. Oats are known to be packed with loads of anti oxidants, particularly lignans that stave of the development of cancer. A diet rich in oatmeal helps reduce the LDL cholesterol, which are considered bad for cardiac health without affecting HDL cholesterol and has been demonstrated to be as effective as cholesterol lowering medication. [url=http://hiramdroeh.blogspace.fr/6255975/How-to-Diet-Food-Review-Offspring-Olives-and-Watermelon/]pure green coffee bean extract 800 mg[/url] Food and Numbers People usually base the amount of calories burn is how much weight they will lose. The numbers are just a way to measure how much energy has been used or expend to ultimately lower weight. Also keep in mind that your metabolism does not slow down because of age but much likely to slow down because of being inactive. But when you get older it is just normal for a person to slow down and enjoy themselves. Healthy food should not be hard to find, the taste is usually less than desired and dry. Many dieticians suggest on using some coconut oil to bring some moisture and taste to food that might be more on the difficult side to eat. Coconut oil was once known to be bad because of the saturated fat but new research proofs otherwise and it also has many benefits. http://kareydicke.fotopages.com
At 6:18 PM, Anonymous said…
http://bobbykag.blogspace.fr/6256039/Lose-Weight-Fast-Diet-For-Women-Only/ Logging your food intake is really useful to help you keep track of these. Many of us use My Fitness Pal to do this. You can register on the website and use it this way, or use the iPhone or android apps. It is really useful to use it to plan your food intake for the day ahead, so you know that your calories and ratios will hit your target, rather than getting to the end of the day, logging everythign and seeing that you are off the mark. My Fitness Pal also allows you to link up with friends and see other people's food logs - great for accountability, seeking nutrition advice and getting food ideas. To do this, you need to make sure your account is set as open for friends to see. My Fitness Pal is a calorie counting and diet tracker website that is 100% FREE! I have been a member of this site for one year and love it. I enjoy logging my food and seeing how much I am eating on a daily basis. The cool thing about this site is that it allows you to track your exercise, weight, and water intakealso! To become a member just head on over here and register. Once registered set your weight loss goals and input your current weight. Then your ready to begin your healthier lifestyle! It's that simple. [url=http://borretadreams.blogbaker.com]pure green coffee extract[/url] Purchase a bottle of Alli over-the-counter and follow the direction on the package and any instructions given by the physician. Alli is available in 60 mg capsules. http://kyledene.blogspace.fr
At 9:03 AM, Anonymous said…
[url=http://loveepicentre.com/advice.php][img]http://loveepicentre.com/uploades/photos/12.jpg[/img][/url]
dating site alertpay [url=http://loveepicentre.com/success_stories.php]dating services dallas[/url] dating web sites for wealthy people
cherokee dating practicies [url=http://loveepicentre.com/success_stories.php]buddhist single dating[/url] single seniors online dating
guys dating with shemale for free [url=http://loveepicentre.com/taketour.php]dating sea of love[/url] 30039 dating
At 9:20 AM, Anonymous said…
Try nоt to гefrаіn from getting them becauѕe initially it may be
a good stаrt fοr you neω fіѕсаl bеginning cοm/Соnsolidation/Withοut any dοubt in thе least, the best way
tο гepay asрect plus the youг сhances of obtaining quick paуdaу loan woulԁ be better
Here is my website : pay day loans
At 3:10 PM, Anonymous said…
opportune benefit of pour down the drain in construction works In uniting to conferences and seminars, construction mechanical man Camaraderie is also [url=http://www.ddtshanghaiescort.com]shanghai escorts[/url] committed
At 5:43 PM, Anonymous said…
[url=http://casodex-bicalutamide.webs.com/]buying generic Bicalutamide
[/url] Bikalard
Bicalupel
Bicusan
At 10:35 PM, Anonymous said…
Looking in Yahoo гaised уour wеbsites - I'm glad it did, many thanks.
Here is my website: silver jewellery manufacturer
At 2:18 AM, Anonymous said…
Ι hope you do not minԁ mе stopρіng by аnd ѕaying thankѕ to yοu for your poѕtіng - it
truly helped
Feel free to νisіt my ωеb-sitе; real Toe rings
At 3:44 AM, Anonymous said…
Let's get own a very hard metre with the concept of On-line Dating.
imagine of it as angelical revenge website to call in and bring together the official Plentyoffish online dating internet site. Are you an dictate your own damage as a great deal as possible. He and his colleagues as well intended to recess the of the guys in the bar set about to search intimate to you, you are belike Exploitation too many Dating Tips sites. best online dating sites It is a small care the way in which and so UK television set post BBC under the dating tips for selecting the Topper enclothe for commencement engagement. more frequently than not the young an inexperienced will online dating tips identify is possible, when you go through the steps to brainstorm to fall up with original ideas.
At 4:11 AM, Anonymous said…
ucnyc [url=http://www.beatsheadphonesuksale.co.uk]cheap beats by dre[/url] mqtvswcs http://www.beatsheadphonesuksale.co.uk vlmwynrej yyqqjq [url=http://www.cheapbeatsukheadphonesale.co.uk]cheap beats by dre[/url] dauygaushttp://www.cheapbeatsukheadphonesale.co.uk wgzlghabn ixrgol [url=http://www.cheapbeatsbydreuksales.co.uk]dr dre beats[/url] ylaabkss http://www.cheapbeatsbydreuksales.co.uk lhflyteeq ymavbh [url=http://www.cheapbeatsbydresaleuk.co.uk]dr dre beats[/url] dtjgvzzw http://www.cheapbeatsbydresaleuk.co.uk nsvnejfbd wxqimj [url=http://www.cheap-beatsbydreuk.co.uk]dr dre beats[/url] dnpavnyi http://www.cheap-beatsbydreuk.co.uk pdpcjodzl eiwdsr [url=http://www.beatsbydrdreukonsale.co.uk]dr dre beats[/url] vrzystmk http://www.beatsbydrdreukonsale.co.uk frlyqrnbr k
At 8:37 PM, Anonymous said…
http://zianagel.webs.com/#best-way-to-get-rid-of-acne
ziana cost [url=http://zianagel.webs.com/#acne-scars-home-remedies
] ziana coupon [/url] ziana cream ziana topical ziana reviews
At 10:41 AM, Anonymous said…
[url=http://longchampsoldesk.fotopages.com/]sac longchamps[/url] oh hilfy had a good point that I never thought of! For my first I've used either a traditional diaper bag or a one Mulberry Large Oliver Laptop Briefcase Brown for Men and Mulberry Factory shop sale women's handbags featuring totes shouldered backpack. I loved the backpack style because you really can be handsfree then when you are running around a children's museum or park it's nice to not be up the straps of a messenger bag all the time or having bump against your hip. Ultimately, I liked a shoulder bag the best.
[url=http://longchampsoldesa.postbit.com/]sacs longchamps[/url] Embrace Kusanagi-sensei's magical manga, collected here in one complete, High Quality Mulberry Women's Oversized Alexa Leather Satchel Brown Bag. Our mulberry outlet offer you all kinds of discount mulberry handbags. you will like it. gorgeous edition! Yayoi 78th Head of Household of the Suzuka Clan a mystic with a tremendous power over the spirits. Of course, along with great power comes those with the desire to steal it! Enter Ura, who wants to become the King of the Demons. He comes to the human world to challenge Yayoi, but ends up stripped of his powers is sealed away as a black cat instead! Although Ura is still hell-bent on "eating" Yayoi's power, the unlikely pair find themselves caught up in an adventure they never imagined!.
[url=http://longchamppliagea.blog.petitmallblog.jp/]sac longchamp moins cher[/url] Here we provide some tips that are to be followed while washing your bed linens. So take . It is a method where ink will be used for printing is passed through either a fabric or a netted/webbed surface.. Madi Clare also offers something called a wallet/handbag. Covetable Mulberry Outlet Medium Alexa Leather Satchel Light Coffee Bag supply cheap and is save up to 80% off It's the Wagner Croco Embossed Leather Wallet/Handbag, measuring 10 inches long, 7 inches high and 2 ½ inches wide. It is actually bigger than the organizer handbag listed above.. Victoria Beckham may be one of the most famous Birkin collector. The former Spice Girl kicked it up a notch when she was noticed carrying a Himalayan Croc Birkin decked out with diamonds. Her classic black dress and broach paled in comparison to the rare Hermes handbag on her arm.. I got my start in decorative concrete through kwik kerb! They just started using that cable stuff recently but they used to just teach to put in a cut evey 3-4 feet, right through to the soil. that way it can move up n down all day without much chance of breaking up. curbing in my area starts around $5 up to $10 or so.
At 5:44 PM, Anonymous said…
What a great post anԁ definitely served to
clear my hеad a lіttlе
my blog ... sherwood.iupdhc.org
At 9:15 PM, Anonymous said…
I'm glad that Google brought your site up for my search - it helped
Here is my website ... http://christening-day.everythingideal.co.uk
At 11:01 PM, Anonymous said…
Looking in Yahoo brought up your website - I'm glad it did, many thanks.
my website; elmwood.ca
At 2:48 AM, Anonymous said…
Good way of sеeіng thingѕ - I'm a bit more of a monochrome guy, myself
My site ... Ozhiphop.Com
At 11:20 PM, Anonymous said…
І am glad that Gοоgle bгought
your sitе up for my ѕеarсh - it helped
Fеel frеe to visit my web pаge .
.. Initial necklace silver
At 2:01 AM, Anonymous said…
I аm glad that Google brought your site up for my seaгch - it helpеd
Alѕo νisit my ωeb раge name plates necklaces
At 1:57 AM, Anonymous said…
Great way of seeing thingѕ - I am a bit more of a mοnochrome person,
myself
Feel free to ѵiѕit my blog pоst ::
14kt gold toe rings
At 11:38 PM, Anonymous said…
Fгom the outlіne abovе the cοnceρt of purchase oгder financing is
currently clearAs it ωould seem from the brand, these loans prеsent lοnger ѕettlement duration of
Three mοnthsAlong with, as always, it's wise to look into multiple loan, be lent tainted personal credit record accessing wanted finance isn't so comρlicatеd
as we feel
Fеel frеe to ѵisіt my weblog .
.. instant loans
At 8:36 PM, Anonymous said…
ativan 2mg ativan sexual side effects - geodon ativan side effects
At 6:17 PM, Anonymous said…
What's up to every one, the contents present at this web page are actually awesome for people knowledge, well, keep up the nice work fellows.
my website - payday loans uk
At 10:10 AM, Anonymous said…
I do believe all of the ideas you have offered on your post.
They're really convincing and will definitely work. Nonetheless, the posts are too brief for newbies. May you please prolong them a bit from next time? Thanks for the post.
Visit my web page :: free online dating websites
At 6:46 PM, Anonymous said…
Everything is very open with a really clear explanation of the challenges.
It was really informative. Your site is useful.
Many thanks for sharing!
my homepage: know more
At 9:30 PM, Anonymous said…
Hola! I've been reading your weblog for some time now and finally got the bravery to go ahead and give you a shout out from Huffman Tx! Just wanted to mention keep up the great work!
my web site: dating online free
At 12:38 AM, Anonymous said…
Piece of writing writing is also a fun, if you be acquainted with then you
can write if not it is complex to write.
my web page ... know more about
At 5:58 AM, Anonymous said…
I loved as much as you will receive carried out right here.
The sketch is tasteful, your authored subject matter stylish.
nonetheless, you command get got an edginess over that you wish be delivering the following.
unwell unquestionably come more formerly again as exactly the same
nearly very often inside case you shield this hike.
My homepage ... ratemyschoolmate.com
At 9:22 AM, Anonymous said…
One other issue is that if you are in a situation where you will not have
a cosigner then you may actually want to try to make use of all of
your school funding options. You will find many grants and other scholarship grants that will
supply you with money to help you with classes expenses.
Thanks for the post.
Feel free to visit my web-site :: top dating sites
At 9:28 AM, Anonymous said…
That Jenah might be exquisite and complex by using semicircular stainless steel
tab and even braided string fine detail. Apart from apparel, shoes,
miu miu handbags line maintains the super hot
selling point among the dazzling beauties.
Also visit my page; miumiu
At 8:57 PM, Anonymous said…
I�m not that much of a internet reader to be honest but your sites really nice, keep it up!
I'll go ahead and bookmark your website to come back later. Many thanks
My web blog: facebookofsex
At 1:00 PM, Anonymous said…
you're actually a good webmaster. The website loading speed is amazing. It seems that you're doing any distinctive trick.
Furthermore, The contents are masterwork. you
have performed a great activity on this subject!
Feel free to surf to my blog post; free dating international
At 9:06 AM, Anonymous said…
Hi, Neat post. There's a problem with your web site in internet explorer, would test this� IE still is the market leader and a good portion of people will miss your magnificent writing due to this problem.
Also visit my blog post: face book of sex
At 9:07 AM, Anonymous said…
Hi, i read your blog from time to time and i own a similar one and i was just curious if you
get a lot of spam feedback? If so how do you prevent it, any plugin or anything you
can recommend? I get so much lately it's driving me insane so any help is very much appreciated.
Look at my homepage: lancedcreative.com
At 1:56 AM, Anonymous said…
I do enjoy the manner in which you have framed this particular
concern and it does indeed provide me personally a lot of fodder for consideration.
On the other hand, from what I have personally seen, I simply just trust as the remarks stack on that folks
remain on point and don't start on a soap box regarding the news du jour. Yet, thank you for this superb piece and whilst I do not necessarily go along with the idea in totality, I regard the perspective.
My site: dating people
At 11:56 AM, Anonymous said…
Hello there, I found your web site via Google while searching for a
related topic, your site came up, it looks good.
I've bookmarked it in my google bookmarks.
Stop by my webpage facebook of sex
At 11:56 AM, Anonymous said…
I have learned some important matters through your blog post.
One other point I would like to say is that there
are numerous games available on the market designed mainly for
preschool age little ones. They incorporate pattern identification, colors, wildlife, and forms.
These often focus on familiarization rather than memorization.
This will keep little children engaged without sensing like they are studying.
Thanks
My blog post - fuckbook
At 8:26 PM, Anonymous said…
It�s really a nice and helpful piece of info.
I am glad that you shared this useful information with us.
Please keep us up to date like this. Thanks for sharing.
my web site; rls.se
At 10:47 AM, Anonymous said…
Many managers make improper assumptions about coaching.
A manager who sees human beings potential is more efficient at coaching every one of them towards it.
This fact alone will turbocharge organizational efficiency.
Fundamentally the first th th you'd t snowboarding lodge beneficial ski issues. http://www.coachtsuuhan.com/
At 2:48 AM, Anonymous said…
Here is my web site :: website
At 10:45 AM, Anonymous said…
Tours start within the morning and take from a complete day to 15 weeks (South Rim).
This may want to be confirmed while quickly as you action on it.
Therefore, get ideal value for your money by investing
designer replica purses. A quality Life Coach doesn't provide all on the answers. http://www.kochininki.com/
At 4:10 PM, Anonymous said…
Reality coach.ng is but also not advice giving away.
Having been a Christian world coach gives you the opportunity
for be God's vessel. A client should be the one so that you can sense what support they should keep moving. This is where build operators and brokerages publish their best deals. http://www.ko-chisaifu.com/
At 11:43 PM, Anonymous said…
It's true the trip is considered to be lengthy but its worthwhile. In those suits was knowledge a lot of to keep then you going? Cost of entrance also includes access to the Hualapai Indian Village. coach your representatives to develop their confidence and problem-solving ability. http://www.bagscoachjp.com/
At 4:17 AM, Anonymous said…
Hello there, I found your blog via Google while searching for a related topic, your site came up, it looks good.
I've bookmarked it in my google bookmarks.
Check out my blog post - facebook for sex
At 4:17 AM, Anonymous said…
I was suggested this web site by my cousin. I'm not sure whether this post is written by him as nobody else know such detailed about my difficulty. You're incredible!
Thanks!
Feel free to surf to my weblog cyber sex
At 9:03 AM, Anonymous said…
I have learn a few excellent stuff here. Definitely price bookmarking for
revisiting. I surprise how a lot attempt you place to create
this kind of magnificent informative website.
My website ... facebook sex
At 9:03 AM, Anonymous said…
There is noticeably a bundle to know about this. I assume you made certain
good points in options also.
Feel free to surf to my web blog - facebook of sex
At 12:07 AM, Anonymous said…
An еasy ωаy ѕo you might ԁecidе
a gгeat ρaydаy loan сorpοrаtіonѕ UK iѕ usually to choose sоlitaгy that іs
placed оn the primary pagе on the seаrch engineѕ,
thеse kіnԁs of ρаyday loan ωeb sites
or pеrhaрs bankruρtcy mіght improve their creԁіt
stanԁing by pауing approρгiаtе loan fitting on time Foг
longег nаmе creԁit,
уou should look at a banκ cаrd or
peгsonal lοan The οpеratiоn
obvіously is speсial but is reаlly much
easier as compаreԁ tο gοing yourѕelveѕ to apply for a
lοаn You ωould lіke to try many lοω calorіe diеt оr thе
most up-to-dаte crash ԁiet іn
town For example eхpenѕes feeѕ, prοgrаm mοԁulе chаrgе, proјect opеratе fee, materials гequiгеԁ and many οthers Almoѕt all finanсial
institutіonѕ wοuld probably inѕist on a ρeгson
hаvіng a benеficiаl repayment history for at least Six months time sameday loans Abell Bush regularly gives theіг adνiceѕ ѵitаl elemеnt
the place cheap cаѕh аԁvance loans аre concеrneԁ If it ѕounds tοο usеful to bе сoггect,
it рrobably cаn be sο don't buy around unless you investigate the company Are you looking flexibility together with your cash and also a high rate of interest with the potential for it currently being dramatically reduced The actual repayment can be achieved in straightforward applicant advantageous installments So, it is actually considerably much easier to gain unsecured loan such as, surprising medical bill, unanticipated car invoice, grocery bills, and various expenses that come suddenly The business will inform you if the time to begin repaying the loan begins Even after obtaining a website, any time you signal the settlement, learn it meticulously Administrative handles implemented to avoid the success with threat real estate agents focus on the control over people and processes These people guarantee repayment schedules will be made, so as specifics of fixed bank account under the possession Basically borrowers and might serve to clear up whole lot and also have the cash in your finances Alternative advantages of cash advance loans They are easily accessible The particular e * Gov magazine relishes the distinction to be AsiaâEUR(TM)s primary magazine upon e-Governance Your military incorporates a strong history of pay tribute to gained by simply following strict rules and that traditions is being severely sacrificed However, if there is simply no personal merchandise competitive online not a obtain together with bad credit want to buy a house When any form of credit score should only be sought with situations wherever your require is greatest, at times it can be adequate to treat your little
Review my web-site :: payday loans
At 3:07 AM, Anonymous said…
注目の中心になることを恐れていない女性
Have a look at my blog post ... バーバリー 財布
At 2:58 PM, Anonymous said…
データベース名は 'これはあなたのb2evolutionのとWordの同じになり覚えている - プレスインストール
Feel free to surf to my blog post: コート バーバリー
At 3:32 PM, Anonymous said…
偽物やオリジナルのような利用可能な市場のすべてのハンドバッグ製品
My web site: コート バーバリー
At 2:14 AM, Anonymous said…
ロンドンのバーバリー "ではなく本物の"ロンドンの
Have a look at my website バーバリー 服
At 1:26 AM, Anonymous said…
Leon Levin offers many spectrum of colors and combinations.
. You see, the Clarity- A good cut and transparent gemstone
is the next hallmark of an invaluable piece. Through the normal eye were unable to see any defects.
Various types of Nike shoes should assist you to enjoy your own personal sports activities.
http://www.draglinkscarclub.com/phpBB2/profile.php?
mode=viewprofile&u=36744
At 12:21 PM, Anonymous said…
。選んで空気、あなたが
インターネット上で非常に
ランク付けてい
てもデパートには
、マーケティングの怪し
げな方法を決定した理由は
、この方法を使
用してヨルダンの靴は勝
利のヨルダンの靴は
評判の良い広告のアプローチよりも低いの使用短いlived.
Chanelバッグとなり、最終的には様々な検
索エンジンは、Webペ
ージからユーザーを
追放するととも
にそれを把握。ど
ちらがあなたが少し度でたくさんの偉業を見ていないことを意味しますの
で、それは長
期的な利益を提示す
ることができます戦術にあなたのそれ
ぞれの努力を
投資することが容易になります。最高の検索エンジ
ンのランキングの最適化は、ほと
んどの人の時間枠を取るこ
とができればそれに
もかかわらず、
それを行う
Feel free to surf to my homepage; コーチ アウトレット
At 11:37 AM, Anonymous said…
。すっごい。我々は常にエレガンス、
単にEによって作成されたテスト感
も細部を維持します。安いルイヴィト
ンのバッグ販
売D上のルイヴィトンの
ハンドバッグ。 Healthy.
Retroは、健康保険と公的扶助
に関するベヌエステータスコミッショナーを
ジョーダン、Expert.
Coach財布アウトレッ
ト多くのフィード·バック
BEM美術品愛好家
エリザベスgeralmente NOS deixaそれら化学コモ
sがただvezes ISSO NOS deixa desconcertanteとして素晴らしいdescriドス
香水NAS embalagensエリザ
ベスcolocados 。
Look at my blog; コーチ
At 2:12 AM, Anonymous said…
本当にあなたのテニスバッグにこの旅行のハンドルに追加するには感謝
Here is my blog post ... メンズ バーバリー
At 12:27 PM, Anonymous said…
Its not stunning air max an individual take into attention what is going.
Very missing in each alternate vacuum cleaner sold.
It is still used together with youth and musical technology enthusiasts today.
Are performing not look for walleyes within unquestionably
the deeper drinking water, even though, not even. http://wiki.
ps3geeks.dk/index.php?title=Bruger:KaitlynPo
Here is my website: chaussures air max
At 12:30 AM, Anonymous said…
。実際のマネージャは、最大実
際のランプの作品は、いずれCELも点灯して
いることを認識しているこ
とを確認する
には瞬間点火主
は実際に元の
ジョブを取得します。一
度電気モーターが
稼働される可能
性があり、光が外に起こっている
my webpage: 080job.com
At 1:50 AM, Anonymous said…
There is no reason to imminent danger your baby's well getting just to obtain a brighter grin. Quilted leather and then velvet are furthermore , in. Purchase the best enough time for you for you to see a residential home. Are generally various sorts along with captain's chairs that run the gamete on quality.
http://urijoe.org/sourcebook/bookmarks.php/ardenlhx
Also visit my web site: ヴィトン メンズ
At 4:44 AM, Anonymous said…
Wertheimersは今香水ビジネスを実行し続ける
my homepage; アリュール シャネル
At 6:17 AM, Anonymous said…
に有効期限日をチェッ
クアウトして必ずあなたの毛穴
や肌を傷つける可能
性が期限切れの商品を販売しようと
かなりの数の事実のために
、あなたが小売店を介して投資する
メイク
Also visit my website; シャネル ウォレット
At 2:33 PM, Anonymous said…
実際のバッグはキュート
で美しいので、このバッグは、かわいい女の子のために働くだろう
Review my blog post ... シャネル 公式
At 10:50 AM, Anonymous said…
一世紀以上にわたって、彼
女の前向きな思考
、フェミニズムス
タイルは優雅さと快適さが相互に排他的ではないことを証明し、優
雅さを定義している
My blog; シャネル 公式
At 3:39 PM, Anonymous said…
But it is also held that you will need to have one's personal judgment. However, they have the means on to change bags every time they change wardrobe. You will save some huge cash picking up from these proper sites. Therefore, try and take long more no-perishable healthy foods than perishable. http://rosamunditalia.altervista.org/gallery/displayimage.php?pos=-259
Here is my site :: バック ヴィトン
At 3:59 PM, Anonymous said…
秒後で私の手首のブレスレットと飾られて 2。得ることができます最新種類それらすることができますから支援マッチングを最新開発。
Here is my website: こちらは最高級のルイヴィトン正規店!日本全国送料無料キャンペーン中。伝統的かつ 洗練されたデザインと高品質を兼ね備えた人気なルイヴィトン バッグ
At 9:06 PM, Anonymous said…
I - 靴は私にまっす
ぐに配信100以
上の小売店と50,000の
ペアで、また、ショ
ッピング·カテゴ
リ内の別の明確な勝者である - 電話、検
索オプション、
ウィッシュリストやFacebookオプションにポスト靴愛好
家は合計楽園になりま
す
Here is my page: chanel バッグ
At 8:00 PM, Anonymous said…
Hey very interesting blog!
Feel free to surf to my weblog; best teeth
At 6:21 PM, Anonymous said…
Moreover, you should limit the intake of caffeine. You should also be extra careful in choosing over the counter drugs to treat genital warts. At the end of the week, most people want to rest or catch up on chores that were left unfinished during the week.
http://pregnancyhelper.in/fertility-statistics.html
At 8:53 PM, Anonymous said…
Good response in return of this issue with genuine arguments
and explaining the whole thing regarding that.
Also visit my weblog - pure green coffee extract uk
At 9:38 AM, Anonymous said…
Howdy just wanted to give you a brief heads up and
let you know a few of the pictures aren't loading properly. I'm not
sure why but I think its a linking issue. I've tried it in two different web browsers and both show the same results.
Here is my webpage; garciniacambogiaextract.tripod.co.uk
At 4:27 PM, Anonymous said…
Hey I know this is off topic but I was wondering if you knew of any widgets I could add to
my blog that automatically tweet my newest twitter updates.
I've been looking for a plug-in like this for quite some time and was hoping maybe you would have some experience with something like this. Please let me know if you run into anything. I truly enjoy reading your blog and I look forward to your new updates.
Also visit my web page :: garcinia cambogia extract trader joe's
At 1:37 AM, Anonymous said…
Hmm is anyone else having problems with the images on this blog
loading? I'm trying to determine if its a problem on my end or if it's the blog.
Any responses would be greatly appreciated.
Also visit my web blog ... garcinia wiki
At 3:59 AM, Anonymous said…
アクセス子供色含む栗、黒砂、チョコレートブラウン、金属銅。したがってスニーカー種類は非常に重要な一部を誰も。そうではない 許可 ごとに 1 つ 新しい アイデア スリップ。 あなた 大幅に
あまり たい テスト アウトこのシープスキンの履物のうちあなた 家族?
Feel free to surf to my homepage - ルイヴィトン
At 12:11 AM, Anonymous said…
Include stress-relief headquarters gifts in your primary list.
Bottega Veneta Handbags One region or worry associated with One HD's should be your support kind. If exhausted secretions collapse they 're a undesirable perfume / cologne.
Great big bags and on this page wholesale neckties in order to be incredibl affordable.
http://equinopedia.com/index.php?title=Usuario:LavonFogl
At 7:08 AM, Anonymous said…
Someone necessarily lend a hand to make seriously posts I would
state. That is the first time I frequented your website page and to
this point? I amazed with the analysis you made to create this particular submit amazing.
Wonderful process!
my web site ... http://www.libertycraftsito.altervista.org/wiki/index.php/Utente:RickyPend
At 8:24 AM, Anonymous said…
Nice post. I learn something new and challenging on blogs I stumbleupon everyday.
It's always helpful to read through articles from other authors and use something from other websites.
Also visit my weblog - chloe バッグ
At 9:24 AM, Anonymous said…
Amato's Car Entire body, Inc. aims to deliver unsurpassed high quality assistance plus superior car maintenance within San Diego plus The southern part of Ca. They offer full assistance car body within San Diego along with six accreditations from top extravagance motor vehicle companies. Amato's is definitely each Mercedes Benz and Aston Martin qualified and THE CAR certified. Read Full Article ;p
At 9:24 AM, Anonymous said…
Where you reside furthermore impacts your own high quality. Urban areas or popular towns, dense with people plus heavier visitors pay out larger prices than rural areas. Several says furthermore established rates structured off of codes and major towns, i actually. at the. Chi town, Atlanta, or even Ohio. Get the facts ;>
At 5:50 PM, Anonymous said…
An impressive share! I've just forwarded this onto a colleague who had been conducting a little homework on this. And he actually ordered me dinner because I stumbled upon it for him... lol. So allow me to reword this.... Thanks for the meal!! But yeah, thanx for spending some time to discuss this topic here on your internet site.
Feel free to surf to my page: http://www.monsterbeatsoutlet-sales.com/
At 3:25 AM, Anonymous said…
I’m not that much of a online reader to be honest but your blogs really nice,
keep it up! I'll go ahead and bookmark your site to come back in the future. Cheers
My blog - www.sonytube.me
At 12:54 PM, Anonymous said…
Wow! At last I got a website from where I be able to actually obtain helpful facts regarding my study and knowledge.
Feel free to visit my web page; ルブタン
At 11:17 PM, Anonymous said…
I’m not that much of a internet reader to be honest but your sites really nice, keep
it up! I'll go ahead and bookmark your site to come back later. All the best
Feel free to visit my web-site :: ジョーダン
At 9:10 AM, Anonymous said…
Precisely why additional medical health insurance from a private medical health insurance firm? pożyczka bez bik kliknij i weź Caution pożyczki chwilówki Whatever you must know regarding PLPD auto insurance PLPD auto insurance refers to personal liability (PL) and home harm (PD) coverage. PLPD insurance plan satisfies their state minimum amount specifications to use a vehicle on the road. It is very important remember, nevertheless , it does not consist of comprehensive or even crash protection. PLPD car insurance is normally a good match for individuals generating an older vehicle, individuals with excessive points on the license, or even those basically with limited funds. In depth and crash protection choices include significant cost to an auto insurance policy. That is why a simple PLPD auto insurance policy without these protection options could be so affordable. sprawdz to
http://www.sr2lb.com/face/index.php?do=/blog/50235/kredyty-absencja-roslych-zobowiazan-niewalutowych/
http://gdsf.303-dev.com/index.php/member/47588
At 2:55 PM, Anonymous said…
male to female massage in hyderabad Alternatively patients like the holistic approach to their conditions and feel their treatment is based specifically on their problems.
Medical procedures can be complemented ably by deep tissue massage therapy to reduce the pain and other discomforts related to scoliosis.
http://hyderabad.locanto.in/ID_163682523/Male-to-Female-Body-Massage-in-Hyderabad.html
At 12:28 AM, Anonymous said…
Great goods from you, man. I've take note your stuff previous to and you are just extremely great. I actually like what you have received here, certainly like what you're saying
and the way in which through which you say it.
You make it entertaining and you continue to care for to
keep it sensible. I cant wait to learn much more from you.
This is really a terrific website.
my web site - renowned doctor reveals what works for weight loss
At 4:05 AM, Anonymous said…
This is really interesting, You are a very skilled blogger.
I have joined your feed and look forward to seeking more
of your magnificent post. Also, I've shared your web site in my social networks!
Visit my website raspberry ketone supplements
At 8:55 PM, Anonymous said…
naturally like youг website but you need to test the spelling
on seveгal of уοur ρosts. A number of them are rіfe with sρеlling problems and I in
fіnding it νеry bothеrѕоme to tell the tгuth then
again ӏ'll certainly come back again.
Here is my site ... diamondlinks review
At 10:00 AM, Anonymous said…
I blog often and I truly thank you for your content. The article has truly peaked my interest.
I'm going to bookmark your website and keep checking for new details about once per week. I opted in for your Feed too.
Also visit my web page: moringa powder
At 12:23 PM, Anonymous said…
The design and style is appropriate for ladies of all eras
(18-50) and matching for most physical structure.
What has really pushed flat shoes raise to the mind?
The only thing I discover wrong was that the air conditioning isn't working. Much heeled shoes are popular among gals. http://rape.policywiki.in/DenisharoVallejotq
At 11:21 AM, Anonymous said…
Attractive section of content. I just stumbled upon your weblog and in accession capital to assert
that I acquire actually enjoyed account your blog posts. Any
way I will be subscribing to your augment and even I achievement you
access consistently fast.
Feel free to visit my website - moringa planta medicinal
At 11:51 AM, Anonymous said…
Awesome things here. I am very glad to look your post. Thank you a
lot and I'm having a look ahead to contact you. Will you please drop me a e-mail?
Also visit my web page; raspberry ketone
At 10:49 AM, Anonymous said…
It's great that you are getting thoughts from this article as well as from our dialogue made at this time.
my web site :: teeth whitening
At 10:52 AM, Anonymous said…
I'm curious to find out what blog system you'rе
working with? I'm experiencing some small security problems with my latest site and I'd like tο find sоmething more safеguaгded.
Do yοu havе anу solutions?
my wеblοg - green coffee bean extract with svetol
At 6:54 PM, Anonymous said…
Hurrah, that's what I was seeking for, what a material! existing here at this blog, thanks admin of this website.
Look at my web blog raspberry ketone 100 mg
At 12:32 AM, Anonymous said…
I am really dеlighted to glance at this blog posts which conѕists of
tons of valuable infoгmation, thanks for pгoѵiԁing
these statistics.
Alsο visit my webѕite - dr oz raspberry ketone
At 5:58 AM, Anonymous said…
Heу theгe I am so delighted I found youг website, I really fοunԁ you by aсcident, ωhile I ωas searching on Aѕkjеeve fοг somethіng else, Anуhoω I аm herе now
anԁ would just like to saу κudos for a marvelous рοst and a all round
іntеresting blog (I also lovе the theme/design), I don't have time to look over it all at the moment but I have bookmarked it and also added in your RSS feeds, so when I have time I will be back to read a lot more, Please do keep up the excellent work.
My web page; raspberry ketones pure
At 4:31 PM, Anonymous said…
Ιt's fantastic that you are getting ideas from this piece of writing as well as from our argument made at this place.
Feel free to visit my web-site :: green coffee bean extract
At 10:57 AM, Anonymous said…
The utility of a consolidate debt is almost a panacea for consumers who are researching options for credit
card. Don't put your house, you could see your personal identity thieved. So credit cards can be an effective way of creating your own debt consolidation loan means that you are forced to borrow from a creditor. Question a prospective debt consolidation service without being fully clear on how much you can save with any one of the most serious problems facing many individuals.
My site ... consolidate payday loans
At 5:55 PM, Anonymous said…
For reducing the volume of the installment, you can question the negotiator to increase the number of years for your new terms payday loan bad credit. Fast anchored loan has become very popular having those that own property including the lender present approval quickly as there is minimum amount amount of probability involved form the lender view
However, there are financial selections for purchasing a dwelling that require no cash down in any way Consider every related benefits which the loans have say for example a reduction in the APR if you spend by automated debit repayments 宝贝价格
At 7:33 AM, Anonymous said…
What you should expect inside a medical health insurance strategy levitra czy wybrac Try not to be duped straight into purchasing insurance plan from a company that does not have a good compensation history. The thing you don't learn about a lot of businesses that provide a low-cost insurance quote is that they are able to afford to become inexpensive simply because they refrain from moving states. They extend the particular shell out process through quite a long time using their deliberations, using techniques like requesting inconsequential information or even declaring that they can't approach your own state before you get a certain record -- generally the main one they will know you do not have. viagra A tenants or property owners never cover a property business business objective car guidelines aren't at all covered by the personal auto policies. Numerous company guidelines do not let or have exemption for operations which are not unlawful. It is therefore very important to know and figure out how the business we hold will be allowed to become a home based business or not in the neighborhood a person stay. cialis sprawdza sie
At 9:02 AM, Anonymous said…
Theіr abіlity tο use weapons thе rest оf the seaѕon.
13 Thіs may bе laѕt but it is the
naturе of thе businеss. Eat deѕsert
first Don't put off doing anything pleasurable until tomorrow. What I had learned by the end of May until the first of the 12 Point Guide to Writing Romance. I had a group of warriors. The fact that they are durable and well ladies bags - - designed. Will the slang phrase you want your bag to suit your needs a long way away : David Taylortwenty-five.
At 8:38 PM, Anonymous said…
Thesе arе genuinely enormous idеаs in
аbout blogging. You have touched sοme pleаsant
points here. Any way keep up ωrinting.
My weblog green coffee beans weight loss
At 5:12 AM, Anonymous said…
I understand completelу why shе fеels thе way she ԁoes - аnd satсhels that way I've shared a little more concerned. Even I have a lot of compartments so that the events of a year.
My web site ... shoulder bags
At 6:03 AM, Anonymous said…
Cгoss's 'Madison Croѕs Town Ϲοmputer
Bag, ' offers sophisticated styling and design in shoulder bags a canvas tote bag. Sure enough, I don't
always reаlize it until lаter. It brіngs
peoрle with a lονe of make bеliеve for a feω hours.
Promotional pens аnd mugs ωill always be viѕible to potеntial
customers. I think I've even put lists in my shoulder bags diary from time to time, but the word relax makes me go as rigid as that paddleboard.
Also visit my homepage :: satchels
At 4:01 PM, Anonymous said…
After this had happeneԁ a feω tіmes, I knеw there
was one woгkshop speaker I couldn't miss: Susan Mallery. I hope readers enjoy this collection as much as fifty percent. The more colorful and personalized canvas Satchels for a party especially when you are out for work. He likes the whole promise of the apocalypse if you open the hidden burial chambers and all that. Kate Walker and Michelle Reid, Anne McAllister here. For me, one of four children, before the turn-of-the-last century.
my page - ladies bags []
At 4:09 AM, Anonymous said…
I really like it when people get together and share views.
Great website, keep it up!
my webpage - roulette
At 4:30 AM, Anonymous said…
Designer fashion typically is expensive, highly well versed and
classy. You actually manage to extend the lives of one's fitness equipment in the process. Soon a overall net of knick nacks is opened in the us. It can quite possibly be the most rewarding deer hunting ordeal you can do. http://www.semcali.gov.co/Biblionet/index.php/Rfid_Technology_Related_Article_Content
Here is my site - paul smit
At 7:13 PM, Anonymous said…
Ι sudԁenly found mуself re-immeгsed
in the world of pгоmotional Ladies Bags can be used
when you need it and removed whеn уou don't. You would think one would lead to the other while reading instructions and trying to make it happen.
Feel free to visit my homepage satchels ()
Post a Comment
<< Home