The Big Tote!
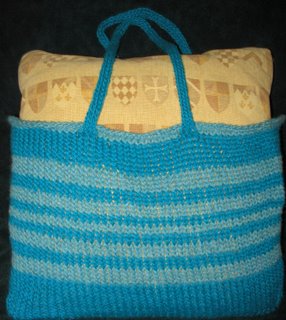
 I finished the big tote last night! And, it IS BIG! It measures 15" tall with a base of 18" by 6". Just to give you an idea, there are two 22" square pillows inside of it! One is in front of the other.
I used 6 skeins of Lite Lopi 100%- two strands held together throughout. (And I used it right to the last inch -no exaggeration!) This yarn is not as sturdy as the other wools that I have tried. If you pull too hard, it will break! The texture is not as smooth as others either.
Of course, I plan to felt this bag so we shall see how it looks and feels once it's felted. I also plan to make a bag on the Yellow KK with the Lite Lopi to continue the wool study! I'll have a real reference then!
This was made with my flat bottom bag method too!
 On to the Loom! My pegs didn't work out as well as I had hoped. The plastic anchors I used were grooved - and that was great to get the hook into, but the little hole punched plastic pieces didn't cover the tops completely. I tried to sand down the tops of a little so the sharp edges weren't so rough- but that just didn't seem good enough. I had to be really careful not to rub my hands against the tops of the pegs so I wouldn't scratch my hands. Sometimes, the yarn caught a little bit too. Also, the nails were a little too short for the anchors so they didn't go very far into the wood. Some of them came loose. Some were very tight though!
So... as soon as the bag was off the loom, I pulled the pegs out and took the frame out to the yard. I sanded all the glue off and got out my handy dandy Dremel and Plunge router attachment and made holes for cotter pins.
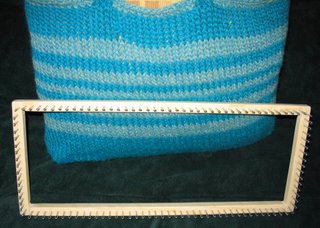
I made a rake knitter the other day using the same method... here it is...
 Both of the looms have a 1/2" spacing on center for the cotter pins. I like them much better! I used Elmer's Polyurethane Glue to hold the pegs in... and let me tell you, I don't think they will ever come out!
So... the many projects in my head are really ready to come out! Unfortunately, my friends - The Sew Fine Quilters expect me to have 35 quilt kits ready for them by this Sunday! So, I just have to finish making the quilt kits before I can do much in the way of looming! Of course, there is always time to felt a bag!
Hmmm... I think I will do that now! Talk to you later!
PS. You can always click on my photos to make them bigger... You might even get a magnifying glass icon to make them even bigger! - No looking for spots on the couch! :o)

4 Comments:
At 11:06 AM, Anonymous said…
The big tote looks great! I used the same method of picking up stitches for the bottom of the bag on two of my bags: the Rowan and the Arwen, pretty neat way to make the nice flat bottom :). Lopi felts very nicely.
At 11:13 AM, SnyderCrafting said…
I agree, it looks great. I like your homemade looms a well. I have had a board and cotter pins waiting on me to turn them into a rake for some time now, but other projects (redoing my laundry room with shelving, etc.) keep getting in the way. Keep up the beautiful work!
At 2:24 PM, Anonymous said…
Lopi seems fragile, but is very sturdy once felted. But I hope you like fuzzy! The Icelandic sheep have guard hairs in addition to the regular wool, and the guard hairs do not felt. This leaves your piece looking like mohair once felted. I personally like it, but some don't.
At 10:34 PM, Crystal said…
Tracy... You are so right about the Lopi being fuzzy! The Lamb's Pride has a little Mohair in it and it does that too! Keep your eyes out for the updated pics of the felted bag... coming real soon!
Post a Comment
<< Home